
Dryer performance problems often start in the vent. In Naperville, Florida—where cold winters can freeze exterior dampers and summers bring humid air that helps lint stick—troubleshooting begins with airflow. This step-by-step guide will help you isolate common issues, decide what you can fix yourself, and know when to call a professional. You will learn how to read the symptoms, run quick diagnostic checks, and address the root causes behind long dry times, hot laundry rooms, and persistent odors.
Before you begin, remember that prevention is the best cure. Routine dryer vent cleaning and periodic checks of the exterior termination dramatically reduce the likelihood of the problems described here. Still, if you are already dealing with slow drying or weak airflow, the steps below will guide you toward a solution.
Symptom checklist: what is your dryer telling you?
- Clothes take more than one cycle to dry, especially towels and bedding.
- The laundry room feels unusually warm or humid after a load.
- You notice a burnt-lint or hot metal smell during operation.
- Outside, the vent flap barely opens, or airflow feels weak.
- The dryer shuts off mid-cycle and restarts later.
- Lint accumulates around the exterior hood or on nearby siding.
These clues point toward airflow restriction, but the cause can vary—from simple lint buildup to a stuck damper, crushed connector, or even a disconnected joint inside the wall.
First diagnostics: quick and safe tests
- Airflow test: Turn the dryer to a timed or air-only cycle. At the exterior hood, confirm strong air movement and a fully opening flap. Weak flow indicates a restriction.
- Heat test: If clothes emerge very hot but damp, heat is present but cannot escape—another sign of blockage.
- Odor test: A warm, dusty or burnt-lint smell often signals lint collecting near hot components due to poor exhaust.
- Visual check: Ensure the termination is clear of leaves, snow, or nesting materials.
If any of these tests suggest restriction, proceed to targeted checks based on your home’s vent layout.
Check the transition connector
Pull the dryer forward slightly and inspect the short connector linking the dryer to the wall or floor duct. Look for crushing, kinks, or damage. This section is frequently pinched when the dryer is pushed back after cleaning the floor or after an appliance move. Replace foil or vinyl connectors with semi-rigid or smooth-wall metal transitions and keep the connector as short and straight as possible. A crushed connector alone can add significant backpressure.
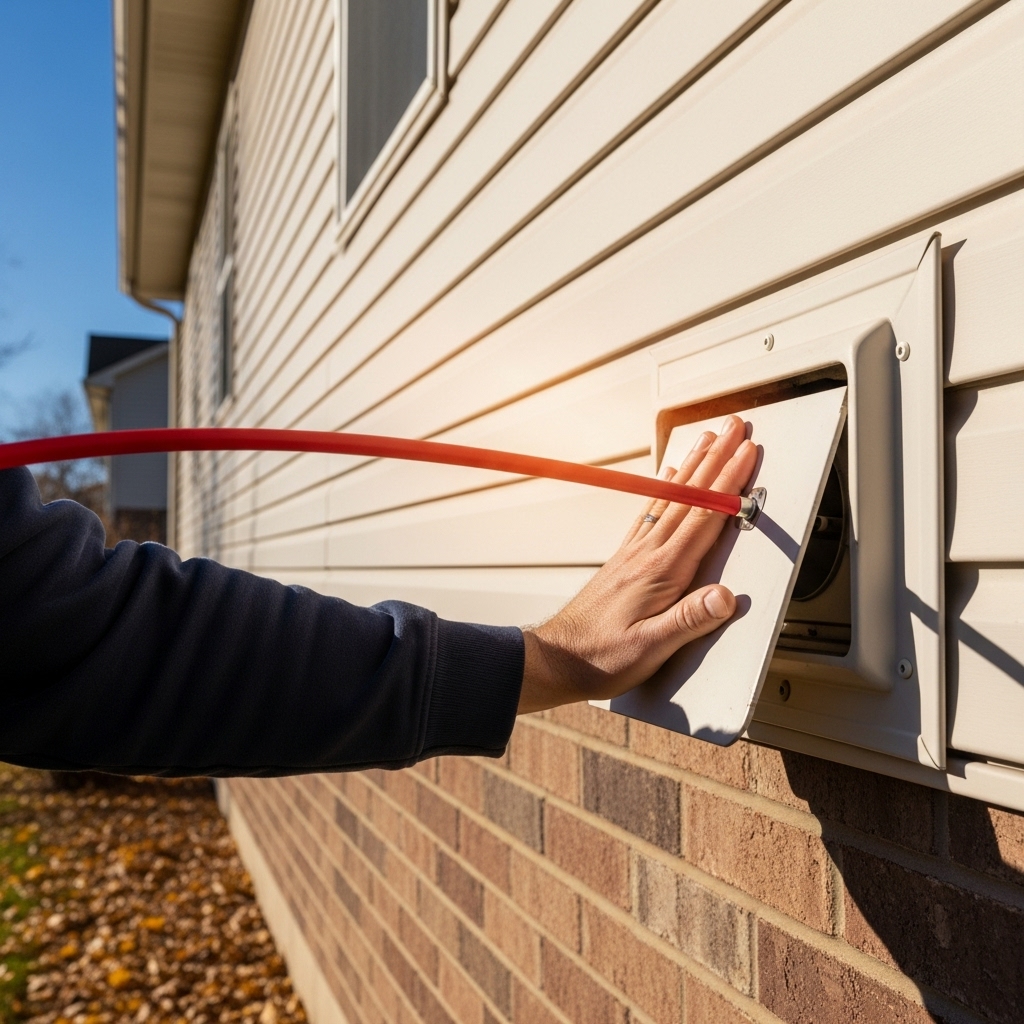
Evaluate the exterior termination
Watch the damper while the dryer runs. It should open freely and close when the dryer stops. In Tampa winters, ice can hold the flap shut; in spring, birds may nest inside unprotected caps. Never add a mesh screen that can trap lint. Instead, choose a dryer-rated hood with a sensitive damper. If the cap is damaged, stuck, or poorly sealed to the siding, consider replacement.
Look for long-run complications
Two- and three-story homes often route the vent up interior walls and through attics to the roof. These long runs can hide elbows where lint compacts. DIY kits struggle to reach and effectively clean such routes. If your home fits this description and airflow remains weak after basic checks, professional cleaning and inspection are warranted.
Condensation and cold-weather issues
When warm, moist air passes through a very cold duct, condensation can develop and leave behind residue that catches lint. Over time, this mixture becomes stubborn buildup. Ensure long horizontal runs are slightly pitched toward the exterior to prevent moisture pooling. In very cold snaps, verify that the damper moves freely and that snow is not blocking the hood.
Noise and vibration clues
Rattling sounds in the wall or ceiling may indicate a partially blocked section where air tumbles and vibrates the duct. A chattering exterior flap suggests marginal airflow barely lifting the damper. Both signs point to restriction and justify a full cleaning.
Electrical or appliance faults versus vent problems
Vent restrictions and appliance faults can look similar. If the dryer produces little heat at all, an internal component may have failed. But if heat is present and drying is slow, suspect the vent first. A quick exterior airflow check is the best differentiator.
Mid-troubleshoot decision point
If you have cleared the termination, corrected a crushed connector, and still see weak airflow, schedule a professional dryer vent cleaning. Complex routes, roof exits, and compacted lint are common in Tampa homes and require specialized tools. A technician can also verify that joints are sealed, elbows are intact, and the damper operates correctly.
Preventive upgrades to reduce future issues
- Replace foil or vinyl connectors with semi-rigid or smooth-wall metal transitions.
- Reduce unnecessary elbows and keep the run as straight as possible.
- Use foil tape on duct joints; avoid screws that protrude into airflow.
- Install a dryer-rated termination with a free-moving damper and no screen.
- Support long runs to eliminate low spots where lint can collect.
These improvements reduce static pressure and help your dryer maintain consistent performance.
Detailed symptom-to-cause guide
- Long dry times with hot clothes: Vent restriction from lint buildup, crushed connector, or stuck damper.
- Musty odor in laundry room: Poor exhaust leaves moisture; check lint screen, vent path, and termination.
- Dryer shuts off mid-cycle: Overheating due to restricted airflow; inspect for compacted lint and correct blockages.
- Visible lint outside near hood: Damper not sealing, back-drafts, or turbulent airflow depositing fibers.
- Water stains near vent path: Condensation from cold ducts or low spots where moisture collects.
Use these clues to prioritize inspection points and actions.
When wildlife is the culprit
Birds occasionally choose warm vent caps as nest sites in spring. Feathers, twigs, and nesting materials can dramatically restrict flow. If you suspect nesting, do not run the dryer until the obstruction is removed. Install a dryer-appropriate termination that prevents reentry while allowing full airflow.
After troubleshooting: verify performance
- Run a timed dry cycle with a normal-sized load and note the time to fully dry.
- Check exterior airflow again. The damper should open fully and remain steady.
- Monitor odors. A clean vent should eliminate the burnt-lint smell.
- Listen for quiet operation. Reduced vibration and flap chatter indicate restored flow.
Keep a simple maintenance log so you can spot changes early—especially useful through Naperville’s seasonal shifts.
Frequently Asked Questions
Q: How often should I inspect my vent? A: Review the lint screen every load and the exterior termination monthly. Plan a professional inspection annually or sooner if symptoms appear.
Q: Can I add a screen to keep birds out? A: Avoid mesh screens; they trap lint. Use a dryer-rated termination with an integrated damper or guard designed for dryers.
Q: Why does my laundry room feel humid? A: Restricted exhaust leaves moisture indoors. Clearing the vent and confirming damper movement usually resolves this.
Q: Do long runs always require a booster fan? A: Not always. Many issues are solved by cleaning and improving the route. If a booster is recommended, it must be installed to code and maintained.
Q: Is foil tape safe for joints? A: Yes, use UL-listed foil tape. Avoid screws that protrude into the airflow path.
Q: What if airflow is still weak after cleaning the termination and connector? A: Compact lint inside elbows or long sections likely remains. Schedule a professional cleaning to reach the full run.
Q: Can low outdoor temperatures damage the vent? A: Cold weather mainly affects dampers and condensation. Regular checks and proper pitch mitigate these issues.
Restore safe airflow in your Tampa home
If your troubleshooting points to restriction—or you simply want assurance that your system is clear—schedule professional dryer vent cleaning and enjoy safer, faster drying through every season.