
Tile surfaces are designed for durability, but Tampa’s blend of humidity, sand, and active indoor-outdoor living can challenge even the most resilient floors. A structured, step-by-step routine keeps tile bright and grout lines clear, while reducing the effort required week to week. This guide blends practical DIY tactics with professional insights, so you know when to maintain on your own and when to call for deeper help. If you are evaluating options for a thorough reset, expert tile cleaning can restore clarity to grout, lift stubborn soils, and protect finishes across high-traffic zones.
Whether you are caring for porcelain in a busy kitchen or ceramic in a bathroom that steams up after every shower, the key is process. When steps are followed in sequence, you minimize the risk of pushing soil deeper or leaving residue that attracts new grime. Let’s walk through a Tampa-tested approach that fits real homes and real schedules.
Step 1: Identify Your Tile and Grout
Before you clean, know what you are cleaning. Porcelain and ceramic are common, but not all glazes behave the same. Gloss finishes may show streaks if rinsing is incomplete, while matte textures can harbor fine dust. Grout can be sanded or unsanded, and grout colorant or previous sealers can change how products interact. A quick identification prevents avoidable mistakes and guides product choice.
Natural stone, such as travertine or marble, requires even more caution. Acidic products can etch certain stones quickly. If you are uncertain, choose pH-neutral solutions and test in an inconspicuous corner. Documenting your tile type will also help a professional if you later decide to schedule a deep service.
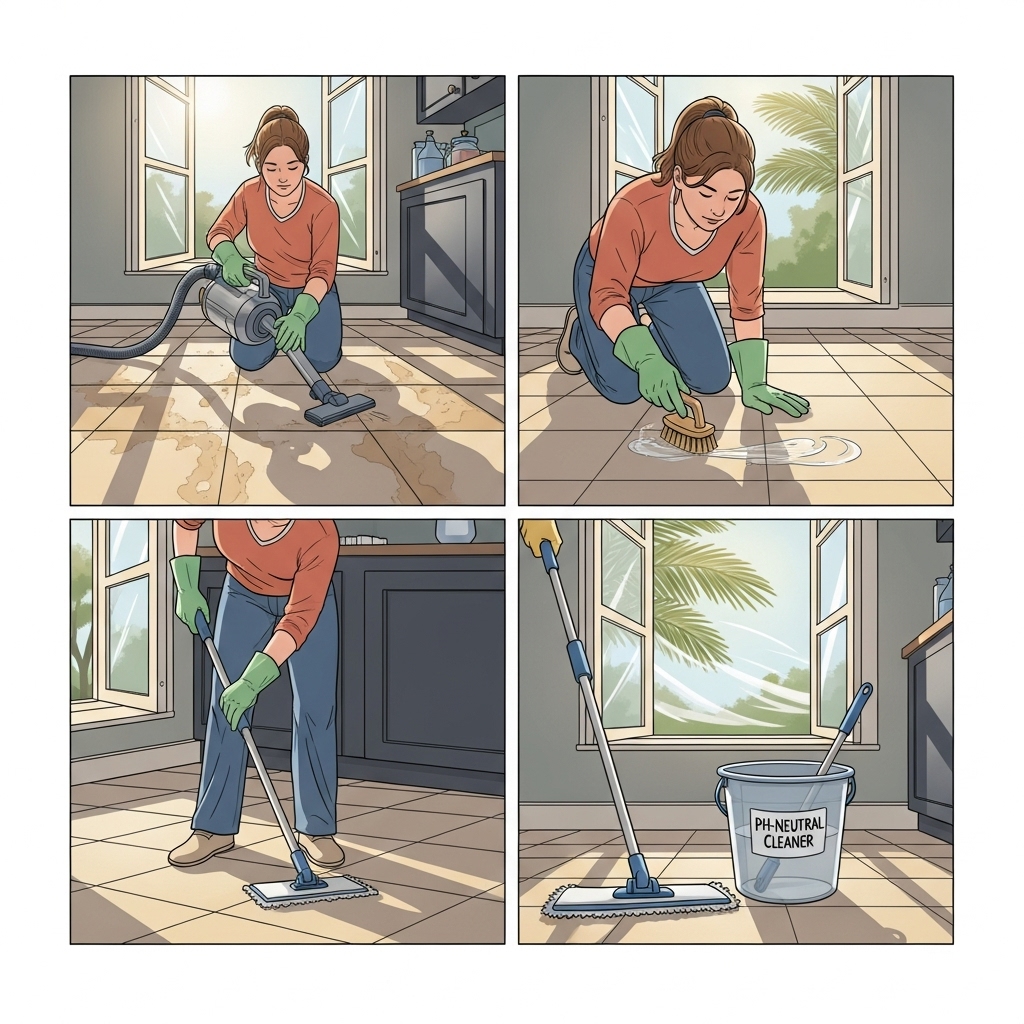
Step 2: Begin with Thorough Dry Soil Removal
Dry soil removal is the foundation of every effective routine. Vacuum slowly to lift grit from grout channels and along baseboards where dirt collects. In Tampa, sand tracked in from parks, beaches, and yards acts as micro-abrasive that scratches glaze. Removing these particles first reduces the chance of dulling the surface during wet steps.
Use a vacuum with a hard-floor setting or a microfiber dust mop. Work in overlapping passes to catch fine dust. Pay special attention to entryways, patio doors, and kitchen thresholds, where soil loads are highest.
Step 3: Pre-Treat Problem Areas
Identify spills, pet zones, or grease-prone areas around stoves. Apply a targeted cleaner compatible with your tile and grout type. Allow appropriate dwell time—long enough to loosen stubborn soils but not so long that product dries on the surface. Agitate gently with a soft brush focused on grout joints and textured tiles where dirt accumulates.
In bathrooms, soap scum and hard-water films can create haze that normal mopping leaves behind. A specialty cleaner designed for these residues can help; just confirm it is safe for your specific surface before applying broadly.
Step 4: Mop with a Neutral Cleaner
Fill a bucket with a measured dose of pH-neutral cleaner and clean water. Mop using a well-wrung microfiber pad, working in sections. Rinse or replace solution as soon as it looks cloudy; otherwise you may redistribute soil into grout. Avoid over-wetting, especially in spaces with limited ventilation—excess water can settle in low points and extend drying times.
Move furniture as needed to reach under tables and along toe-kicks. Keep a few clean towels handy to catch drips in corners and prevent water from pooling along baseboards. Methodical coverage yields better results than speed.
Step 5: Rinse and Neutralize
After cleaning, a rinse pass with clean water removes leftover detergent. This step is especially important for matte-finish porcelain and textured ceramics that hold onto residue. Rinsing prevents sticky films that attract new dirt quickly.
If you used a product with a higher or lower pH to address a specific stain, follow label guidance to neutralize the floor back to a safe range. Balanced pH protects grout integrity and prevents haze.
Step 6: Dry and Ventilate
Open windows when weather permits and run exhaust fans in bathrooms. Use air movement to accelerate evaporation, especially during Tampa’s humid stretches. For kitchens and large rooms, a box fan placed in a doorway pointing outward helps move moist air outside.
Encourage family members to wear clean socks or indoor slippers for the next few hours. Avoid sliding heavy furniture until surfaces are fully dry to protect grout joints and prevent scuffing.
Step 7: Detail the Grout
Once the floor is dry, examine grout lines in bright light. For stubborn areas, use a soft brush with a small amount of cleaner appropriate for grout. Work in short sections and wipe residues promptly to avoid halo marks on tile.
If grout remains discolored after careful detailing, that does not mean it cannot be improved. Often the remaining discoloration is deep-set and best addressed by professional extraction and sealing.
Step 8: Protect with a Sealing Strategy
Grout sealers help resist stains and slow absorption of moisture and spills. A penetrating sealer is commonly recommended for grout, while select tiles may benefit from specific protective products. Discuss your tile type with a professional before applying any sealer broadly. Proper sealing helps your next round of mopping be both faster and more effective.
Keep a simple calendar reminder for future reapplication, adjusting intervals for kitchens, bathrooms, and high-traffic hallways that see more wear.
Step 9: Set a Routine That Fits Tampa Living
Make cleaning align with the way you actually use your home. Daily or near-daily dry dusting in entryways and kitchens prevents abrasive buildup. Weekly mopping maintains clarity. After beach days or backyard gatherings, a quick once-over near doors and on patio-adjacent tile keeps grit from migrating deeper into the home.
Rotate rugs and launder mats regularly to prevent a buildup of fine sand beneath them. This small habit protects both the mats and the tile they cover.
When to Call a Professional
There is a clear line between routine upkeep and restorative work. If grout is persistently dark after careful mopping; if tile feels tacky or looks hazy despite thorough rinsing; or if a previous coating is peeling or streaky, schedule a professional evaluation. Specialized agitation, hot water extraction, and carefully selected solutions can break through bonded films and deep residues.
Halfway through your yearly routine, consider a reset: professional tile cleaning brings the floor back to a clean baseline and simplifies daily care. Many homeowners find that seasonal or twice-yearly refreshes match Tampa’s patterns of humidity and outdoor activity.
Common Tampa Trouble Spots
Entryways accumulate sand and organic matter. Focus on these spaces during every cleaning session and install a combination of outdoor scraper mats and indoor absorbent mats. Kitchens see grease aerosols from cooking, so cabinets, toe-kicks, and the floor behind trash bins need extra attention. Bathrooms require consistent ventilation and frequent wiping to counter steam and mineral deposits.
Laundry rooms, often overlooked, are subject to detergent drips and splashes from pre-treating clothes. These residues can leave sticky patches that attract more dust, so include the laundry area in your regular circuit.
Safety and Surface Care
Always read labels and follow dilution instructions precisely. More product is not better; it is often harder to rinse and can cause films. Wear gloves if recommended, and avoid mixing chemicals. Keep children and pets clear of open buckets and wet floors until the job is finished and the surface is dry.
Use non-scratch scrub pads and soft brushes. Steel wool, razor blades, and hard-bristle brushes can mar surfaces or shred grout. When testing a new tool or product, start in an inconspicuous corner.
Frequently Asked Questions
Does steam alone clean grout? Steam can loosen soils but often needs pairing with extraction or absorbent towels to carry loosened grime away. Without removal, residues can settle back into the joints.
How often should I seal grout? Frequency depends on grout porosity and foot traffic. High-use kitchens and baths usually need more frequent attention. Test by placing a few drops of water on grout; if it darkens quickly, protection may be due.
Why does my floor look cloudy after mopping? Residue from overly concentrated or incompatible cleaners is a common culprit. A rinse with clean water and proper dilution in the future usually solves it.
Is vinegar safe for tile? Vinegar can harm certain stones and degrade grout over time. For safety and longevity, stick to pH-neutral products designed for tile and grout unless a professional advises otherwise for your specific material.
What about pet accidents? Blot promptly and rinse with a neutral cleaner. In cases of repeated incidents on grout, consider professional extraction and sealing to resist future absorption.
Can I clean colored grout the same way as white grout? Colored grout benefits from the same pH-neutral routine but may require gentler spot techniques to preserve uniform appearance. Always test in a discrete area first.
How do Tampa storms affect maintenance? Rain increases tracked-in soils. After stormy days, give entryways an extra pass with dry dusting and a quick damp wipe to prevent grit from spreading.
Will frequent cleaning wear out my tile? Proper methods extend tile life. The risk lies in abrasive tools, harsh chemicals, and over-wetting—not in reasonable, consistent care.
Bring Your Tile and Grout Back to Life
Clean tile transforms a room, making colors pop and spaces feel larger and brighter. With the right sequence—dry soil removal, targeted pre-treating, careful mopping, thorough rinsing, and ventilation—you can keep ahead of daily wear. When your floor needs a true reset, schedule professional tile cleaning to restore grout clarity and protect finishes so your Tampa home looks and feels its best.
Adopt a routine that matches your lifestyle, lean on pros for periodic deep care, and enjoy the satisfaction of floors that stay fresh even through busy seasons, beach days, and backyard gatherings.