
Introduction: Why a Step-by-Step Mattress Clean Matters in Tampa
A clean mattress supports better sleep, protects your indoor air, and extends the life of your bedding. In Tampa, Florida, where heat and humidity are part of everyday life, a step-by-step approach is essential to keep dust mites, moisture, and odors under control. This guide walks you through a complete process you can follow with common household tools, plus a few pro-level techniques suited to Tampa’s climate. If you decide you want expert help at any point, you can explore professional options for mattress cleaning that complement your at-home routine.
The key to success is planning. In a humid city, drying time and indoor airflow matter as much as stain removal. You will prepare your space, pre-treat the right way, clean systematically, and dry thoroughly. You will also learn how to spot moisture issues early and prevent them from becoming long-term problems, including mold and persistent odors.
Step 1: Prepare Your Space and Gather Supplies
Before you touch the mattress, prepare your room for a clean workflow. Open interior doors for cross-ventilation and switch on ceiling fans to encourage circulation. If outdoor humidity is high, keep windows closed and rely on air conditioning or a dehumidifier. Gather vacuum attachments with a clean upholstery tool, enzyme-based cleaner for organic stains, an oxidizing cleaner for discoloration, mild detergent, baking soda, white vinegar diluted in water for deodorizing, several clean white microfiber cloths, a spray bottle, and a portable fan. Keep trash bags nearby for debris and used cloths. Place a clean tarp or mat on the floor to keep removed bedding off dusty surfaces.
Step 2: Remove Bedding and Inspect
Strip the bed completely, including mattress protectors and toppers. Put sheets directly in the washer. As you remove bedding, look for stains, yellowing, sweat rings, darkened areas near the head or foot, and any small black dots, which can indicate dust or other debris. Note any zones that feel damp or cooler to the touch, as this can suggest lingering moisture. Use bright lighting; a flashlight at an angle helps reveal hidden soils and edges of stains that are otherwise easy to miss.
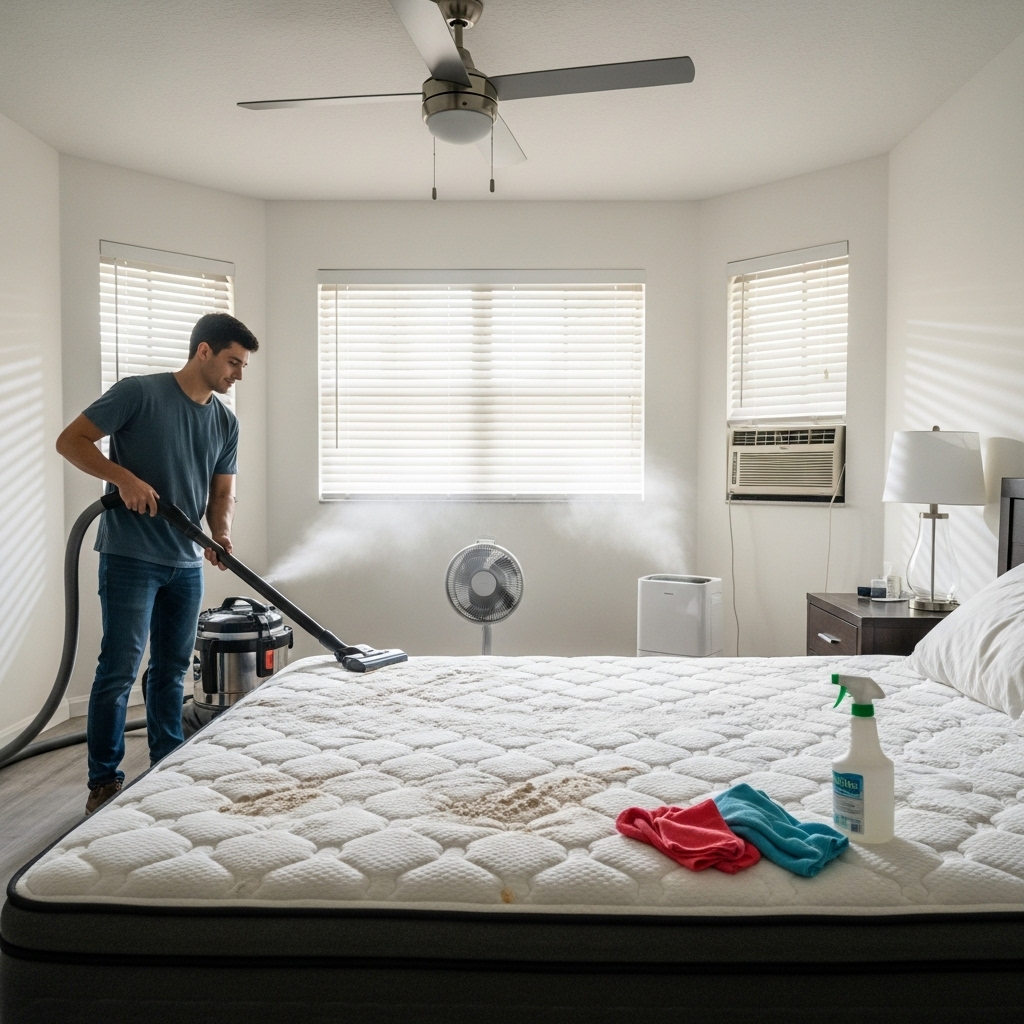
Step 3: Dry Vacuum Thoroughly
Use a vacuum with a clean upholstery attachment. Start at the top surface and move in slow, overlapping passes from head to foot and side to side. Pay attention to seams, tufts, and quilting, as particles tend to gather there. Vacuum the sides as well as the top; allergens and dust can accumulate on the vertical surfaces. Replace or wash your vacuum filter regularly to prevent pushing odors back into the room. In Tampa’s climate, dust can carry humidity, so a thorough vacuum prevents damp particulates from settling back down.
Step 4: Address Fresh Spills Immediately
If you are dealing with a fresh spill, blot—never rub—using a white microfiber cloth. Press firmly to lift moisture out of the mattress and switch to a clean section of the cloth with each pass. If the spill is large, use a stack of cloths and add weighted pressure with your hands to draw out as much liquid as possible. The faster you extract moisture, the less likely you are to face odor or staining problems later. Avoid saturating the area with water at this early stage.
Step 5: Pre-Treat Stains by Type
Different stains require different pre-treatment. For sweat and general yellowing, dab a mild diluted detergent solution and let it dwell briefly, then blot. For organic stains like food or bodily fluids, use an enzyme-based cleaner; apply sparingly, allow dwell time according to instructions, and blot with fresh cloths. For discoloration from oxidation, consider an oxygen-based solution applied carefully to the surface only. Always test cleaners on an inconspicuous area first. Work from the outside edge of the stain inward to avoid spreading.
Step 6: Deodorize Without Oversoaking
Odor often lingers in humid climates. Lightly mist a diluted vinegar solution onto the surface and immediately blot. Follow with a dry towel to lift remaining moisture. Sprinkle a thin, even layer of baking soda over the treated areas and allow it to sit for an hour or more. Baking soda helps draw out residual moisture and neutralize odors. Vacuum it up thoroughly afterward using the upholstery tool. This careful balance of moisture and absorption helps avoid the risk of over-wetting.
Step 7: Surface Cleaning Pass
After pre-treating stains, perform a general surface clean. Lightly mist your cleaning solution onto a cloth, not directly on the mattress, and wipe the surface in sections. The goal is to lift remaining soils without saturating the material. Keep a dry cloth in your other hand to follow each pass and absorb extra moisture. Rotate cloths frequently. In Tampa, less liquid is more effective; minimal moisture combined with airflow reduces drying time and the risk of musty smells.
Step 8: Targeted Steam (Optional and Careful)
Low-moisture steam can be useful, but it must be applied carefully. If you use a steamer, set it to a low-moisture output and keep the head moving. Do not linger in one spot, and avoid steam entirely on mattresses that the manufacturer warns against. The purpose is to lift stubborn grime near the surface and refresh fibers, not to inject water into the core. Immediately follow steam passes with airflow from a portable fan pointed across the mattress, not directly at it, to enhance evaporation.
Step 9: Middle-of-Process Moisture Check and Airflow
Pause and check for dampness. Press a dry cloth onto different parts of the mattress; if it picks up moisture, continue airflow before proceeding. Turn on a dehumidifier in the room if you have one. Tampa’s humidity can extend drying time, so maintaining steady airflow throughout the process is critical. This is a good stage to consider supplementing your efforts with professional-grade methods if needed; for instance, professional mattress cleaning may incorporate controlled drying that accelerates safe moisture removal.
Step 10: Edge and Seam Detailing
Edges and seams can hide soils even after the main clean. Wrap a slightly dampened cloth around your finger and run it along seams, piping, and tufted areas. Follow immediately with a dry cloth. If you notice residue, repeat gently until the cloth lifts clean. Avoid harsh scrubbing that can fuzz the fabric or push debris deeper. Finish by vacuuming edges once more to remove dislodged particles.
Step 11: Full Drying and Mattress Rotation
Position fans so that air moves across the mattress. Maintain a comfortable indoor temperature and keep relative humidity lower by running air conditioning or a dehumidifier. Give drying adequate time; rushing can trap moisture. Once the top is fully dry to the touch and a test cloth remains dry after pressing, flip or rotate the mattress according to manufacturer guidance. Even if you cannot flip it, rotating head-to-foot promotes even wear and drying exposure.
Step 12: Protector Washing and Reassembly
Wash your mattress protector and topper using the manufacturer’s instructions. Ensure both are completely dry before reassembly. In Tampa, even slightly damp protectors can reintroduce odor. Consider a breathable, waterproof protector that blocks contaminants while allowing air exchange. Once everything is dry, make the bed with fresh sheets and pillowcases washed in hot water when appropriate for the fabric.
Ongoing Maintenance in Tampa’s Climate
Prevention is easier than remediation. Encourage airflow daily by pulling back bedding for at least twenty minutes after waking. Run ceiling fans or a dehumidifier during the most humid periods. Vacuum the mattress each time you launder sheets. Address any spill immediately. Plan a more thorough cleaning quarterly, with a deeper stain and odor check at least twice a year. Regular rotation helps reduce body impressions and hotspots for moisture accumulation.
Dealing with Tough Stains
If a stain persists after pre-treatment and surface cleaning, repeat a targeted approach rather than applying a heavy solution. Reapply enzyme cleaner for organic soils and allow proper dwell time. For yellowing from sweat, work gradually with mild detergent or oxygen-based solutions, following label guidance. Patience pays off; multiple light passes are safer than one saturated attempt. Always prioritize drying integrity between applications.
Odor Control Specific to Tampa
Odor control in a humid environment requires vigilance. Keep indoor relative humidity in a comfortable range and focus on airflow. Use baking soda sparingly but regularly when you notice mild odors, and vacuum thoroughly. If you detect a persistent musty smell, consider examining nearby sources such as carpeting or the bed frame slats, which can harbor moisture. Addressing the room ecosystem often resolves mattress odors more reliably than repeated surface treatments alone.
Allergy and Dust Mite Considerations
For households sensitive to allergens, prioritize frequent vacuuming with a well-maintained filter, hot washing of bedding, and a high-quality, breathable protector. In Tampa, dust mites thrive in warmth and humidity, so controlling moisture is crucial. Keep pets off the bed if allergens are an issue, and schedule a deeper clean more frequently during the peak humid season. Rotating pillows and laundering them per instructions also helps reduce allergen load.
When to Seek Professional Help
If you notice wicking stains returning after drying, persistent odors, or slow drying times even with fans and air conditioning, it may be time to bring in a professional. Experts can apply low-moisture deep cleaning techniques and controlled drying that are difficult to replicate at home. They can also inspect for underlying issues like mold risk or materials incompatible with certain treatments, helping preserve the integrity of your mattress.
FAQs
Q: How often should I deep clean a mattress in Tampa? A: Plan for a thorough clean every three to six months, with quarterly vacuuming and quick spot treatments as needed. Humid months may warrant more frequent light refreshes to control odor and dust mites.
Q: Can I use a steam cleaner on any mattress? A: Not all mattresses tolerate steam. Always check manufacturer guidance. If allowed, use low-moisture steam, keep the head moving, and dry aggressively afterward.
Q: What is the best way to remove sweat stains? A: Use a mild detergent solution for general yellowing, and consider an oxygen-based cleaner for stubborn discoloration. Work in small sections and avoid soaking the fabric.
Q: How do I speed up drying in Tampa’s humidity? A: Combine air conditioning or a dehumidifier with ceiling and portable fans. Keep air moving across the surface rather than directly blasting one spot.
Q: Will baking soda damage my mattress? A: Used properly in a thin layer and vacuumed thoroughly, baking soda is safe and effective for odor control.
Q: Is flipping always recommended? A: Some modern mattresses are one-sided. If yours is not flippable, rotate head-to-foot to encourage even wear and airflow.
Q: How do I handle a large spill? A: Blot immediately with absorbent cloths, apply minimal cleaner suited to the spill type, and prioritize fast drying with fans and dehumidification.
Q: What if odors return after a day or two? A: Persistent odors may indicate deeper moisture. Increase airflow, reduce room humidity, and consider professional evaluation if the smell lingers.
Ready for a Fresher Mattress in Tampa
If you want expert support that aligns with Tampa’s climate, schedule professional mattress cleaning and enjoy the confidence of deep sanitation with fast, controlled drying. Pair occasional professional care with the step-by-step process above, and you will maintain a healthier, fresher sleep environment year-round.