
Advanced, Step-by-Step Chimney Cleaning for Tampa’s Unique Conditions
When Tampa homeowners or property managers want the deepest clean and the clearest picture of chimney health, an advanced process goes beyond simple brushing. Coastal humidity, salt air, and storm exposure require thorough diagnostics, precision dust control, and corrosion-aware part selection. This step-by-step guide explains how a professional-grade approach restores draft, reduces odors, and documents system condition—ideal for homes that host holiday gatherings, properties near the water, or systems with a history of storm impacts. Start with a plan, finish with documentation, and reinforce the work with scheduled chimney cleaning at the right season for Florida’s climate.
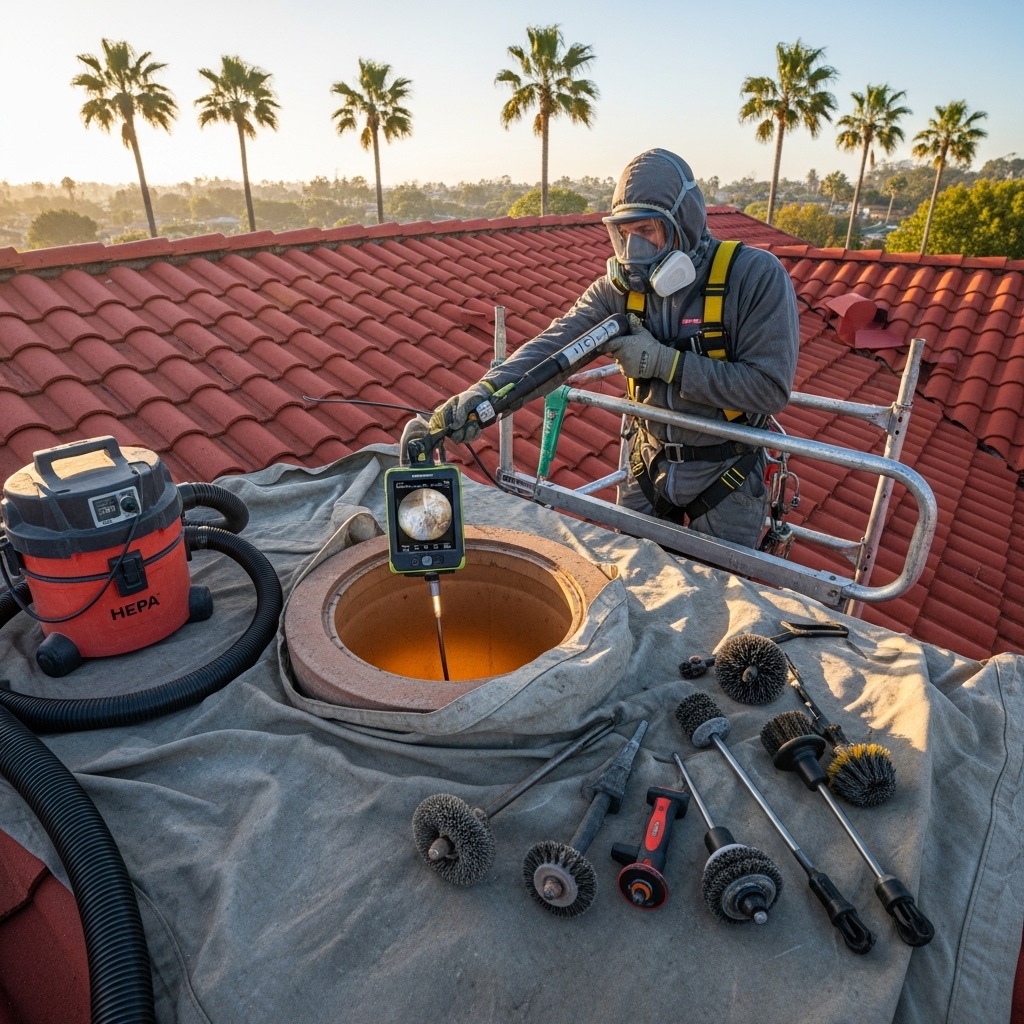
The process below assumes careful safety practices, including roof fall protection, respirators, and high-filtration vacuums. It also accounts for the mix of masonry and factory-built systems common across Tampa neighborhoods. While some steps may be performed by experienced DIYers, the advanced tools described are typically used by certified technicians for best results and minimal mess.
Step 1: Intake, History, and Tampa-Specific Risk Review
Begin with a conversation about usage patterns, fuel type, odor complaints, and any storm history. In Tampa, note nearby trees that shed leaves into caps during fall, past hurricane or tropical storm exposure, and proximity to salt water. Collect previous reports, repairs, or photos. This context shapes the inspection plan and points to likely problem areas such as corroded caps or chase covers, loose flashing, or moisture staining in the smoke chamber.
Verify system type and clearances. Identify whether the flue is clay or metal, confirm chase construction for prefab units, and note the cap style. Strengthen the plan with a clear understanding of the liner size and shape so that brush heads and rotary tools match the interior profile.
Step 2: Containment and Protection
Protect living areas with plastic and canvas in overlapping layers, seal the firebox opening, and connect a HEPA-grade vacuum near the access slit. Cover nearby returns and isolate the work zone. On the roof, stage tools so nothing rolls toward the edge, and pre-check the cap and chase for sharp edges or loose fasteners. Effective containment is especially important in humid regions where soot odors can linger if dust escapes.
Technicians often set up negative pressure at the firebox using the vacuum to draw particulates inward as brushing dislodges them. This increases cleanliness and reduces odor transfer to fabrics and finishes.
Step 3: Topside Assessment and Disassembly
Photograph the cap, screen, crown or chase cover, and flashing before removing components. In Tampa, look closely for salt-related corrosion, wind-bent shrouds, and fasteners that have loosened or rusted. Remove the cap and evaluate the screen for clogging that could restrict draft or trap embers. On prefab systems, inspect the chase cover for ponding marks or seam separation.
Check that the flue tile or metal collar is intact where it meets the cover. Any gaps can admit wind-driven rain. Document all findings for the final report so homeowners can track changes over time and plan proactive replacements.
Step 4: Interior Visual and Video Inspection
Use bright lighting and, ideally, a video scope to inspect the flue, smoke chamber, and damper area. Look for cracks, missing mortar, offset joints, or signs of past chimney fires such as crazed tiles or warped metal. Video allows precise localization of defects and creates a baseline for future comparison, valuable in storm-prone regions.
If moisture staining is evident, trace it to likely entry points—damaged crowns, seams at chase covers, lifted flashing, or even saturated masonry. In Tampa’s humidity, moisture plus soot can create strong odors, so addressing the source is as important as cleaning residues.
Step 5: Mechanical Cleaning Method Selection
Choose between traditional manual brushing, rotary power sweeping, or a hybrid approach based on the inspection. Light to moderate soot responds to manual brushing; heavier creosote often justifies rotary tools that improve contact with irregular surfaces. For metal liners, select poly heads that protect coatings. For clay liners, wire can be appropriate if deposits are not glazed.
When glaze is present, consider chemical treatments or controlled mechanical methods designed for hard deposits. Avoid aggressive grinding that could damage liner surfaces. In severe cases, staged treatments over multiple visits protect the structure while removing hazardous buildup safely.
Step 6: Brushing and Rotary Sweeping
With containment active, proceed from the top down. Advance rods in sections, making multiple passes to ensure even contact. Rotary heads run at controlled speeds to avoid chatter and liner damage. Technicians coordinate with a partner at the firebox who monitors dust capture and listens for unusual sounds that may indicate obstructions or loose components.
After the main passes, target the smoke chamber with specialty brushes and scrapers. This area is often the most irregular and can harbor stubborn deposits that impede smooth flow from the firebox into the flue.
Step 7: Detail Cleaning and Component Service
Vacuum and wipe the firebox, damper, and surrounding areas. Clean and inspect glass doors and replace worn gaskets. Verify that the damper opens fully and seats securely. On gas log systems, confirm that burner ports are clear and that the log placement matches the specification drawing to avoid incomplete combustion and odor complaints.
Topside, clean the cap screen thoroughly and verify that water will shed properly from the crown or chase cover. Replace missing or corroded fasteners with corrosion-resistant hardware suitable for coastal conditions.
Step 8: Moisture and Odor Mitigation in Humid Air
Because Tampa’s air is often saturated, odor control is a core success metric. After cleaning, ensure the damper seals well and that the cap fit limits airflow when the fireplace is idle. Recommend a top-sealing damper for systems that struggle with persistent off-season odors. Discuss wood storage practices and burning techniques that minimize residue.
If moisture pathways were found—such as small crown cracks or minor chase cover seam gaps—outline repair options and timing. Addressing water entry points reduces corrosion, preserves framing, and eliminates the conditions that intensify creosote smells.
Step 9: Post-Cleaning Verification
Re-scope the flue to document results and confirm that deposits have been reduced to safe, manageable levels. Photograph all components after reassembly, including the cap, screen, crown or chase cover, and flashing. From the living area, verify glass clarity, damper function, and that the firebox is free of debris.
When practical, conduct a smoke test or draft check on a cool day to ensure that airflow is unimpeded. Note any environmental conditions, such as wind direction or humidity, that may influence results so the homeowner understands normal variations.
Step 10: Documentation and Maintenance Planning
Provide a written report summarizing inspection findings, cleaning methods used, parts serviced or recommended for replacement, and a photo log. Include a maintenance schedule tailored to Tampa’s seasons: a primary inspection before fall, quick post-storm visual checks, and a mid-season review for households that burn more often around holidays.
Encourage homeowners to keep records with dates and images. Consistent documentation not only supports resale value but also helps catch slow-developing issues related to moisture or corrosion.
Advanced Considerations for Prefab and Masonry Systems
Prefab systems rely on precise clearances and intact metal components; monitor for corrosion around the cap collar and at fasteners. Masonry systems tolerate thermal cycles differently and may show mortar loss or tile cracking after years of service. In both cases, adjust tool selection to protect the liner, and consider material upgrades—such as higher grade stainless caps—near the coast.
In neighborhoods exposed to heavy winds, cap design matters. Some models better resist downdrafts and shed wind-driven rain, improving draft stability and odor control. Discuss options when chronic downdraft or moisture issues exist.
Frequently Asked Questions
How is an advanced cleaning different from a basic service? It adds thorough diagnostics—video inspection, targeted rotary tools, meticulous containment, and detailed documentation—on top of standard brushing. The goal is a deeper clean and a clear record of system condition.
Do gas appliances need this level of attention? When odors, corrosion, or draft concerns appear, yes. Tampa’s humidity and salt can affect metal venting even with minimal soot, making inspections and precise cleaning worthwhile.
Will the process be messy? With tight containment, negative pressure at the firebox, and HEPA filtration, dust escape can be kept to a minimum. Proper setup is crucial in humid climates where lingering odors are a concern.
How often should advanced cleaning be scheduled? Annually for systems that see regular use or present odor or moisture issues, and after significant storms that may have displaced caps or introduced debris. Light-use systems still benefit from yearly inspections.
What if glazed creosote is found? Expect staged removal using specialized tools or treatments to protect the liner while eliminating hazardous deposits. Avoid aggressive grinding that could cause damage.
Set the Standard for Safety and Comfort
An advanced, documented process is the best defense against Tampa’s humidity, salt air, and storm impacts. If you are ready to combine deep diagnostics with meticulous cleaning and proactive planning, schedule professional chimney cleaning and enjoy a safer, cleaner, more reliable fireplace season after season.