
DIY Chimney Cleaning for Tampa Homes: A Complete, Safe Approach
Doing your own chimney cleaning in Tampa, Florida, is possible for light to moderate soot when you pair the right tools with careful safety steps. Our coastal climate adds extra considerations like humidity, salt corrosion, and storm-driven debris, so the process must include meticulous prep and follow-through. This guide walks you through how to evaluate your system, choose tools, clean effectively, and decide when to stop and bring in a professional. If you are unsure about any step, start with an inspection and then complement your work with scheduled chimney cleaning by a qualified technician to confirm results.
Before climbing a ladder or opening a damper, identify your system. Many Tampa homes have factory-built, metal-lined chimneys enclosed in a framed chase, while older homes may feature masonry with clay liners. Each type responds differently to brushes and chemicals. Metal liners typically require poly brushes to avoid scratching, while clay may accept wire brushes if deposits are flaky and light. If you see glossy, tar-like glaze, DIY methods may not suffice and could risk damage without specialized equipment.
Safety First: The Non-Negotiables
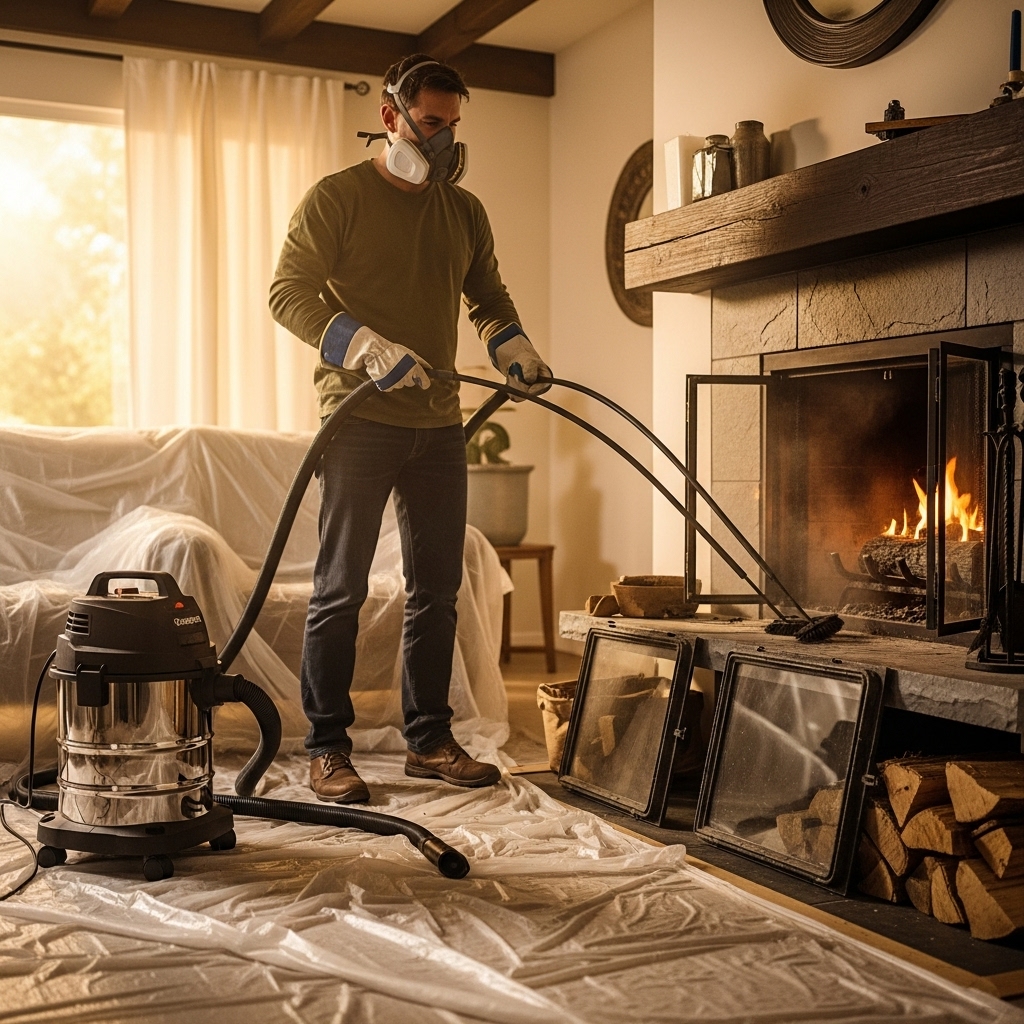
Roof work is inherently risky, especially in a region known for rainfall and slick tile or shingle surfaces. Only access the roof on dry, calm days with non-slip shoes and a secure tie-off. Use a sturdy ladder extending at least three feet above the eave. Wear eye protection, gloves, and a respirator rated for fine particulates. Inside, cover floors and furniture with plastic sheeting and canvas drop cloths to contain soot. Close HVAC returns near the fireplace so airborne dust does not circulate through the home.
Ensure the firebox is stone cold. Scoop ash into a metal container with a tight lid and store it on a non-combustible surface outdoors. Verify that carbon monoxide and smoke alarms function properly before and after your project. Inform someone that you are working at height and keep a charged phone nearby.
Tools and Materials Checklist for DIY Success
You will need a chimney brush sized to your flue, flexible rods, a flashlight or headlamp, a high-filtration vacuum, plastic sheeting and tape for sealing the firebox opening, a small hand brush for the smoke chamber, and scrapers designed for fireplace use. For prefab systems, consult documentation to confirm flue diameter and any manufacturer cautions. Consider a small inspection mirror or a consumer-grade inspection camera for improved visibility inside the flue.
Optional but helpful items include a moisture meter for firewood, a draft thermometer to verify flue temperature during first fires after cleaning, and corrosion-resistant screws to replace any missing fasteners on the cap screen if you plan to remove and reinstall it during the project.
Initial Inspection: Decide DIY or Professional
Shine a bright light into the firebox and smoke chamber. Look for cracked bricks, missing mortar, rust on the damper, or a glaze-like sheen on the flue. From the roof, inspect the cap, screen, chase cover or crown, and flashing. If the cap is missing or damaged, address that before you burn again. If you see signs of wildlife nesting, do not proceed until it is removed by qualified handlers and the flue is sanitized.
If deposits are thin and flaky, DIY brushing is a good fit. If they are thick, tar-like, or glossy, pause. Glazed creosote needs specialized methods and attempting to grind it off can damage liners. In that case, schedule professional help and use your inspection notes to guide the appointment.
Containment and Setup
Seal the firebox opening with plastic sheeting, leaving a small slit near the top for brush rods. Place the vacuum nozzle at the slit, turn on the vacuum, and keep it running during brushing to catch falling soot. Remove and set aside any grates or andirons, and tape over glass doors to prevent scratching or soot infiltration.
On the roof, verify sure footing and lay out your tools within easy reach. Remove the cap carefully, noting how it is attached to ease reinstallation. Take a quick photo of the setup so you can put it back exactly as found. If your chase cover has sharp edges, wear cut-resistant gloves.
Top-Down Brushing Procedure
Attach the brush to the first section of rod and lower it into the flue. Move the brush up and down with firm, even strokes, twisting slightly to reach corners in square or rectangular liners. Add rod sections as you descend until you reach the damper area. Make multiple passes to ensure you contact every interior surface. For metal liners, avoid excessive force that could deform or scratch the walls.
When you reach the bottom, reverse direction and brush back up, then remove the tool string carefully to avoid smearing soot on the crown or chase cover. Use a hand brush to clear the cap screen and remove any trapped leaves or soot clumps. Reinstall the cap, tighten fasteners, and confirm the screen sits flat without gaps that could admit wildlife.
Smoke Chamber and Firebox Cleaning
Inside, with the vacuum still running, open the plastic slit and use a smoke chamber brush or a small, angled brush to clean above the damper. This area often collects heavy soot due to turbulent flow. Scrape stubborn deposits gently and vacuum debris promptly. Clean the damper surfaces and verify full range of motion. Vacuum the firebox thoroughly, wipe down walls, and clean glass doors with a product designed for creosote residue.
Inspect your work. Shine a light up the flue to confirm that surfaces appear dry, matte, and largely free of buildup. Some staining may remain, but a uniform, powdery appearance suggests success. If you still see patches of shiny glaze, note their locations and plan a professional follow-up.
Moisture, Odor, and Tampa’s Humidity
Odors often intensify after rainy days because creosote absorbs moisture. A clean flue helps, but so do tight dampers and weather-resistant caps. If smells persist, consider a top-sealing damper to limit air pathways when the fireplace is not in use. Store firewood off the ground with airflow to keep it dry, and avoid burning palm or other resin-rich woods that can increase deposits.
During summer, keep the damper closed and the firebox clean. If you notice rust on the damper or glass door frames, wipe and dry surfaces promptly. Corrosion can accelerate in coastal air; choosing stainless steel components for caps and fasteners helps extend service life.
When to Stop DIY and Call a Pro
Stop immediately and seek help if you find cracked liners, detached sections, warped metal, evidence of a prior chimney fire, or persistent blockages that brushing does not clear. Unusual draft problems, smoke in rooms during start-up, or carbon monoxide alarm events require expert diagnosis. Many Tampa homeowners combine light DIY maintenance with professional inspections and periodic rotary cleaning for a strong one-two approach.
Mid-season is an excellent time to reassess performance. If the glass darkens quickly, if odors return on humid days, or if start-ups are smoky, schedule a professional chimney cleaning to reset the system and check for hidden issues such as partial blockages at the cap or undetected moisture intrusion.
Preventative Habits for Cleaner Burns
Use seasoned hardwoods and build small, hot fires to encourage strong draft. Open the damper fully before lighting, preheat the flue with a rolled newspaper or kindling, and avoid closing glass doors too early. Keep room air balanced; in very tight homes, cracking a window slightly during start-up can prevent smoke spillage.
Keep combustibles clear of the hearth and mantel. Do not store kindling against the firebox or run extension cords under drop cloths where they can overheat. After each fire, remove ash once it is fully cool and keep a small layer only if recommended by your stove or fireplace manufacturer for easier ignition in the next burn.
Documentation and Recordkeeping
Create a simple log with dates of inspections, DIY cleanings, and professional visits. Include notes on weather events that could affect performance, such as tropical storms, and attach photos of the cap and chase after those events. Documentation helps identify patterns and assures future buyers that the system has been properly maintained.
Frequently Asked Questions
How often should I perform DIY cleaning? Inspect annually before the season and after significant storms. If you burn frequently, a light mid-season brushing may be helpful, but keep annual professional inspections on the calendar.
Is a top-down or bottom-up approach better? Top-down is often cleaner because gravity works in your favor, and it allows immediate inspection of the cap and chase cover. Bottom-up methods can work when roof access is unsafe, but be prepared for additional containment inside.
Can I use chemical logs? They may loosen light deposits but do not replace mechanical cleaning and can produce misleading results if glaze is present. Use them only as a supplement to brushing.
What about gas fireplaces? They still need annual inspections to verify venting, check for corrosion, and confirm safeties function. Residues can be corrosive to metal components even without heavy soot.
Why does my chimney smell after rain? Creosote absorbs moisture, releasing odors. A clean flue, a snug damper, and a reliable cap are the best remedies in Tampa’s humid climate.
Bookend Your DIY With Professional Confidence
With careful preparation, the right tools, and respect for Tampa’s humidity and storms, you can handle light chimney maintenance and keep your system performing well. For a thorough reset, a documentation-rich inspection, or work on stubborn deposits, schedule expert chimney cleaning and enjoy safer, more reliable fires throughout the season.