
Tampa homeowners enjoy plentiful sunshine and mild winters, but even in Florida, solid-fuel fireplaces, wood stoves, and decorative chimneys require routine care to stay safe and efficient. Whether you plan to do some light maintenance yourself or schedule professional chimney cleaning, understanding the step-by-step process will help you protect your home, conserve energy, and extend the life of your system. This comprehensive guide walks you through preparation, tools, techniques, and Tampa-specific considerations such as humidity, salt air, and tropical storms.
Creosote accumulation, wind-blown debris, and moisture intrusion are the primary threats to a chimney in a coastal climate. A regular, methodical cleaning and inspection routine minimizes fire risk, improves drafting, and keeps smoke and odors out of your living space. The sections below cover each part of the chimney system in sequence, from the firebox to the cap, so you can follow along confidently.
Understand Tampa’s Unique Chimney Conditions
Florida’s climate changes how chimneys age and how they should be maintained. Warm, humid air can condense within a cool flue during seasonal temperature swings, contributing to acidic residue and metal corrosion. Coastal winds carry fine salt and sand that can abrade masonry surfaces and screens, while sudden storms and hurricanes can loosen caps, flashings, and masonry joints. Even if you use your fireplace only a few times each winter, these environmental factors still act year-round, making inspections and preventative maintenance just as important as they are in colder regions.
Another local factor is heavy rainfall. Flashings around the chimney must be watertight, or moisture can seep into the attic and walls. Moisture plus soot equals aggressive deposits that stain and eat away at materials over time. Tampa’s tree canopy also sheds leaves and twigs that may clog caps or settle in the smoke shelf, increasing the chance of downdrafts or smoke spillage.
Safety First: Preparation and Precautions
Before starting, prioritize safety. Even for simple cleaning, set up the space properly to protect your home and your lungs.
- Dress for the task: wear eye protection, a respirator rated for fine particulates, gloves, and old clothing.
- Protect the room: lay down canvas drop cloths, tape plastic sheeting over nearby furniture, and cover the hearth opening when working on the roof to prevent soot migration.
- Disable heat sources: ensure the fireplace is completely cool, pilots are off (for gas log sets connected to a chimney), and any electrical blowers are unplugged.
- Lighting: use a bright headlamp and auxiliary work lights to see crevices and soot patterns clearly.
- Ladder safety: use a properly rated ladder on level ground; consider a roof harness on steeper pitches.
Essential Tools and Materials
Having the right tools makes the process smoother and more effective. Most are affordable and reusable.
- Poly or wire chimney brushes sized to your flue (round, square, or rectangular). In Tampa’s humid climate, stainless steel rods and brushes resist corrosion.
- Flexible fiberglass rods for navigating offsets; a short stiff rod for stubborn areas.
- Smoke shelf and firebox hand brushes; crevice brushes for the damper area.
- HEPA shop vacuum with soot bag or filter; broom and pan for coarse debris.
- Plastic sheeting, painter’s tape, canvas drop cloths.
- Flashlight or headlamp, inspection mirror, or compact camera for documentation.
- Non-foaming, masonry-safe cleaners for soot staining on brick and stone.
- Stainless scraper for glazed spots; do not aggressively gouge masonry.
- Basic repair supplies: refractory mortar for hairline joints, silicone for crown cap screws, and replacement cap screens if damaged.
Step-by-Step: Interior and Firebox Cleaning
Begin inside to contain debris, then move upward. This approach keeps dislodged soot from coating freshly cleaned areas below.
- Clear the area: remove grates, andirons, unused logs, and any ash. Store them on a drop cloth for later cleaning.
- Vacuum coarse ash: use a metal scoop first, then a HEPA vacuum to capture fine dust. Never vacuum warm embers.
- Inspect masonry: look for spalling brick, loose mortar joints, scorch marks outside the firebox, or cracks in refractory panels. Document with photos.
- Clean the firebox walls: brush with a stiff hand brush. For stubborn stains, use a masonry-safe cleaner as directed, applying sparingly to avoid soaking the masonry.
- Check the damper: open and close it several times, feeling for smooth operation. Brush soot off the damper plate and throat area; vacuum residue.
- Smoke shelf cleaning: use a long-handled brush and vacuum hose extension to remove leaf litter and soot. Tampa’s winds often blow in palm fronds and oak leaves—be thorough.
- Flue access: if you have a cleanout door at the base, open it and stage a bucket and vacuum for debris that falls during flue brushing.
Step-by-Step: Flue Brushing Technique
Flue cleaning requires patience and a gentle, consistent approach. You can brush from the top down or bottom up; top-down is traditional and keeps most debris inside the flue rather than in your living room.
- Measure and match: confirm your brush matches the flue’s shape and dimensions. An undersized brush leaves deposits; an oversized brush can jam and damage liners.
- Assemble rods: connect enough rod sections to reach the full height of the chimney, adding as you progress.
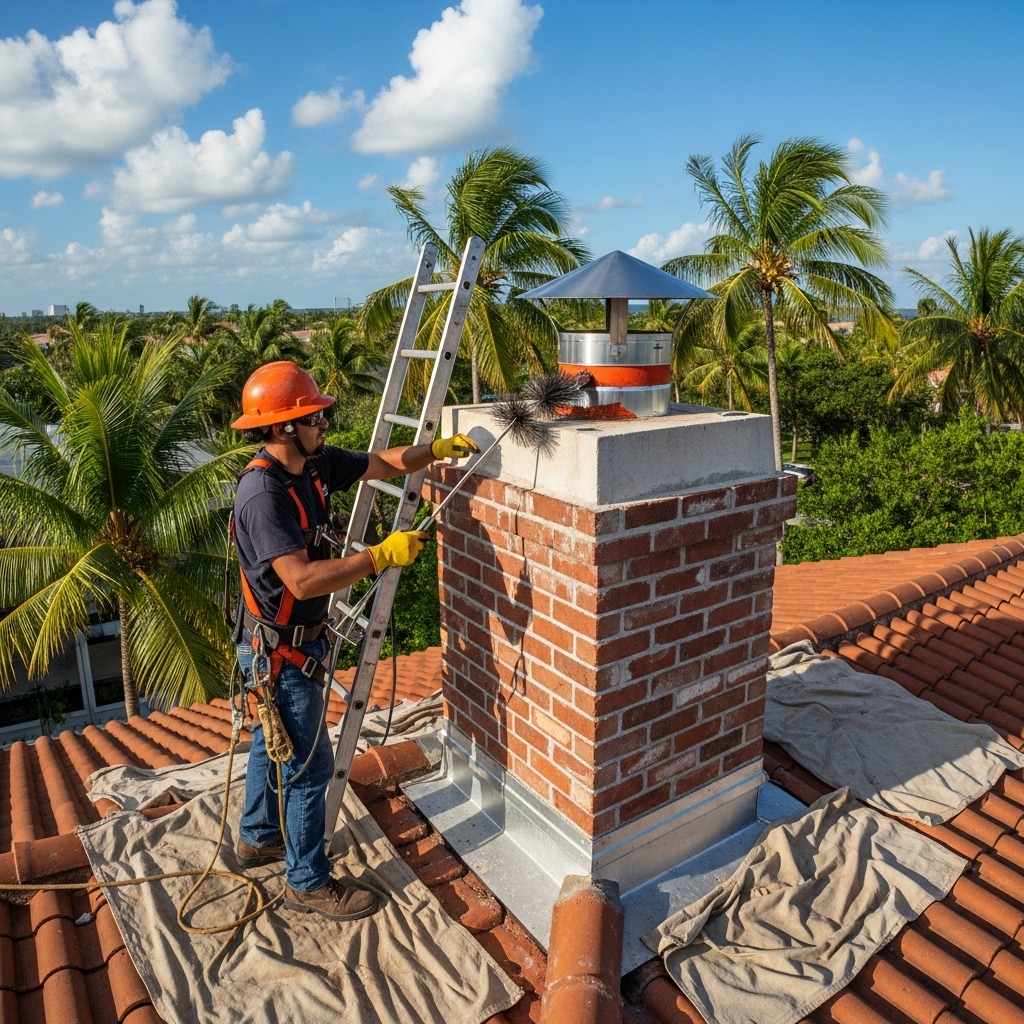
- Top access: on the roof, remove the cap if necessary and stage hardware safely in a bucket.
- Brush in passes: lower the brush to the smoke shelf and work it up and down 6–10 strokes per foot of flue, rotating slightly. Add rods as you ascend, keeping motion smooth.
- Listen and feel: scraping sounds may indicate glazed creosote, which can be hard and shiny. Do not force metal scrapers aggressively; heavy glazing requires professional treatment.
- Repeat and verify: after a full pass, pull the brush and inspect with a light or camera. Perform a second pass if needed until the liner shows a dry, dull finish without flaky accumulations.
- Clean the base: return inside and vacuum debris from the smoke shelf and cleanout. Seal the cleanout door tightly afterward.
Smoke Chamber, Throat, and Damper Details
The smoke chamber, just above the damper, narrows the pathway from the firebox to the flue. Its rough transitions can capture soot. Use a triangular or specialized chamber brush to break loose deposits, then vacuum thoroughly. Check for parging (a smooth refractory coating). If parging is missing or eroded, the chamber may need resurfacing by a qualified technician to improve draft and reduce soot accumulation.
Operate the damper again after cleaning to confirm a tight seal and smooth travel. A damper that doesn’t fully open can cause smoky fires; one that doesn’t close can invite humid Tampa air and pests into the flue during the off-season.
Chimney Cap, Crown, and Flashing Inspection
Head back to the roof for exterior components. The cap protects against rain, animals, and sparks. Ensure the mesh screen is intact with no corrosion holes or crushed sections. Remove nests or debris gently and confirm fasteners are tight. The crown (the sloped top mortar layer on a masonry chimney) should shed water; hairline cracks can be sealed with crown repair products, while wide cracks or crumbling require professional rebuilding. Check step and counter flashing where the chimney meets the roof for tight, continuous seals. In Tampa’s sudden downpours, a compromised flashing can leak large volumes of water quickly.
Also check adjacent roof shingles for soot staining or creosote streaks. These indicate heavy vapors, poor draft, or a cap that vents improperly. Note any tree limbs overhanging the chimney; they can drop debris and restrict airflow. Trim branches back to reduce risk.
Clean-Up, Disposal, and Odor Control
Collect all soot and debris in sealed bags. Soot is messy but not hazardous in small quantities; do not compost it or spread in gardens. Wipe surrounding surfaces with a damp cloth and mild cleaner. If you notice lingering smoke odors, especially during humid spells, place odor absorbers in the firebox and keep the damper closed. Consider a top-sealing damper for improved off-season tightness and odor control—this can be valuable in Tampa’s moist air.
When to Choose DIY vs Pro Service
DIY cleaning is suitable when your flue is straight, deposits are dry and flaky, and the system shows no signs of structural issues. Choose professional service if you observe glazed creosote, damaged liners, persistent odors, stains on walls or ceilings, animal intrusion, or if your chimney has offsets or multiple flues. Mid-season or after a major storm, an expert evaluation can catch small problems before they become costly repairs. If you prefer a maintenance partner, schedule recurring chimney cleaning aligned with your burn habits and Tampa’s weather cycles.
How Often Should Tampa Homeowners Clean?
Frequency depends on fuel type and use. For occasional wood-burning in Tampa’s short winters, an annual inspection with cleaning as needed is a solid baseline. If you enjoy fires weekly, plan on annual cleaning and a mid-season check of the smoke shelf. Gas fireplaces connected to masonry flues need periodic inspection as well to check for condensation and byproduct deposits. After tropical storms or hurricanes, schedule an inspection before the next use, even if you didn’t burn during the previous season.
Post-Storm Rapid Inspection Checklist
- From the yard, confirm the cap is present and level; look for missing screens or bent components.
- Check for fallen bricks or shingle fragments around the chimney base.
- Inspect attic and ceiling areas near the chimney for moisture stains or damp insulation.
- Open the damper and sniff for sharp, acrid odors or animal smells.
- Shine a light up the flue: look for daylight where there shouldn’t be any, indicating gaps or cracked liners.
- Verify the chimney is plumb; any tilt requires immediate professional attention.
Common Cleaning Mistakes to Avoid
- Using the wrong brush size or type, which either misses deposits or damages the liner.
- Skipping smoke chamber cleaning, where soot often accumulates and causes draft issues.
- Vacuuming warm embers, which can ignite collected dust inside a vacuum.
- Neglecting the cap and flashing despite Tampa’s heavy rains and high winds.
- Over-wetting masonry when removing stains, which can drive moisture deeper into the structure.
Signs You’re Done—and Signs You’re Not
After cleaning, the flue interior should look matte and largely free of loose, flaky residue. The damper should move freely and seat squarely when closed. Revive a small test fire and observe: smoke should go straight up, with no spillover into the room. If the fire struggles or smoke backs up, there may be obstructions, inadequate make-up air, or pressure imbalances from exhaust fans and HVAC. Persistent draft issues merit a professional diagnosis.
Frequently Asked Questions
Below are answers to the questions Tampa homeowners most often ask about chimney cleaning and maintenance.
- How can I tell if my chimney needs cleaning? Look for heavy soot fallout in the firebox, a strong smoky smell on humid days, visible deposits on the cap, or slow, lazy flames that create excess smoke. Annual inspections are recommended even for light use.
- Is creosote a risk in Florida’s mild winters? Yes. Even intermittent fires can create creosote, and humidity can accelerate acidic reactions that damage liners and cause odors.
- Do gas fireplaces need cleaning? Gas produces less soot, but moisture and acidic byproducts can corrode metal components and attract fine dust. An annual check is smart, especially with a masonry flue.
- What if I see animals or nests? Do not light a fire. Safely remove nests and install a secure cap with the proper mesh size to deter reentry.
- How long does professional cleaning take? Most single-flue systems take one to two hours, longer if issues are found or access is complex.
- What happens if I skip a year? Deposits harden, odors worsen in humid seasons, and small cracks can become large problems. Timely maintenance costs less over the life of the system.
- Can I pressure wash a chimney? Avoid pressure washing masonry; it can force water into the structure and erode joints.
Ready to Schedule Your Chimney Service?
If you want a safer, cleaner fireplace with dependable draft and fewer off-season odors, set a reminder now to book your annual inspection and cleaning before Tampa’s first cool front arrives. Whether you use your system lightly or love frequent cozy fires, professional support ensures thorough results, documented findings, and timely recommendations about caps, crowns, and flashing. When you are ready, connect with trusted local experts for comprehensive chimney cleaning and enjoy peace of mind all year long.