
Start Here: Upholstery Cleaning for First-Timers
If you have never cleaned upholstery before, the process can feel intimidating. Tampa homes experience four true seasons, which means your furniture sees everything from humid afternoons to slushy winter evenings. The good news is that a few simple steps can deliver big results. This beginner’s guide breaks down the basics of fabric identification, stain response, routine care, and smart drying so you can protect color and texture without stress. If you want an easy head start, you can plan periodic professional upholstery cleaning to reset your furniture while you learn the ropes for everyday maintenance.
Think of upholstery care as a series of tiny habits. Weekly vacuuming, immediate blotting, and mindful moisture use keep most problems small. When you do need to deep clean, you will move more confidently because you understand your fabric and have a tested plan. The steps below are written in plain language and tailored to common household scenarios in Naperville.
Step 1: Find the Fabric Code
Look for a manufacturer tag under seat cushions or along seams. The code guides you:
- W: Water-based cleaning allowed.
- S: Solvent-only; avoid water.
- WS: Water or solvent methods may work—test first.
- X: Vacuum only; leave stain removal to pros.
This small piece of information protects your furniture from accidental damage. If the tag is missing, test cautiously in a hidden spot and proceed slowly.
Step 2: Build a Simple Cleaning Kit
- Upholstery vacuum tool and crevice attachment
- White microfiber cloths and absorbent terry towels
- Soft-bristle brush and a small detailing brush for seams
- pH-neutral cleaner for W/WS fabrics
- Solvent spotter for S-coded materials (with ventilation)
- Club soda for fresh coffee and tea
- Baking soda for deodorizing and oil absorption
- Isopropyl alcohol for select ink spots on compatible fabrics
- Enzyme cleaner for pet accidents on WS fabrics
- Portable fans for quick, even drying
Gather everything in one caddy so you can respond to spills quickly. Speed is one of your biggest advantages.
Step 3: Master the Vacuum
Vacuuming is the unsung hero of upholstery care. Move slowly, overlap strokes, and use the crevice tool along seams. Lift cushions and clean underneath where crumbs hide. For pet hair, lightly dampen a cloth to gather hair first, then vacuum. This dry soil removal step prevents muddy residue if you later add moisture during spot cleaning or a light overall refresh.
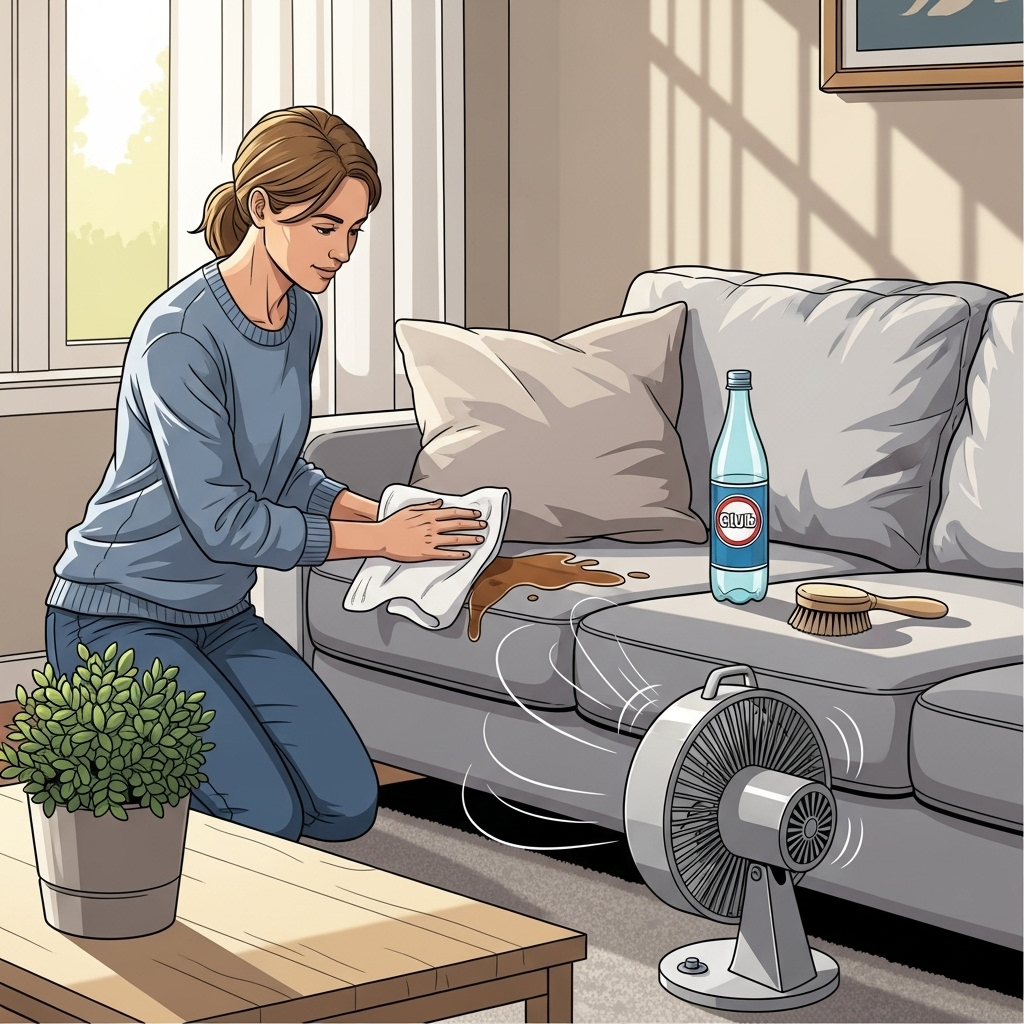
Step 4: Spot Clean the Right Way
When a spill happens, breathe, then blot. Press a clean white towel to lift as much as possible. Do not rub; friction drives soil deeper and distorts fibers.
- For coffee, tea, or wine on W/WS fabrics: Try a little club soda, then blot. Repeat as needed.
- For oils and lotions: Sprinkle baking soda, wait 15 minutes, vacuum, then use a small amount of cleaner on your cloth to blot.
- For ink on microfiber or some synthetics: Dab with isopropyl alcohol on a cloth, working from outside to center. Test first.
- For pet accidents on WS fabrics: Use an enzyme cleaner and allow dwell time. Blot thoroughly and dry quickly.
Finish with a slightly damp cloth to remove residue if your fabric code allows, then run fans for a fast dry.
Step 5: Try a Light Overall Cleaning on W/WS Fabrics
Once you are comfortable with spot cleaning, consider a light, overall refresh. Begin with a careful vacuum. Apply a small amount of pH-neutral cleaner to a cloth or brush and work in small sections with gentle circles. Blot with clean towels as soil lifts. Use a damp cloth to reduce residue, then dry quickly with fans. Avoid soaking the fabric; foam-based products often provide better control for beginners.
Step 6: Respect Solvent-Only Fabrics
If the tag reads S, keep water away. Open windows when weather allows, run fans, and apply solvent to a cloth rather than directly onto the fabric. Work in small areas and allow complete evaporation between passes. Wear gloves and keep solvents away from heat. In winter, choose a mild day or well-ventilated room. If you are unsure, it is fine to seek help until you are more confident.
Step 7: Manage Drying Like a Pro
Drying is as important as cleaning. Overwet fabric can form rings and smell musty, especially during humid Tampa summers. Use fans to move air across the surface and keep cushions slightly propped so interior foam dries evenly. In winter, indoor heat speeds evaporation, but watch for overdrying near vents that can make fibers brittle.
Step 8: Create a Simple Routine
- Weekly: Vacuum and spot check.
- Monthly: Rotate cushions and wash throws and pillow covers.
- Seasonally: Do a light overall refresh on W/WS fabrics and inspect sun exposure and odor hotspots.
This rhythm keeps tasks small and results consistent.
Naperville-Specific Tips
Spring brings pollen—vacuum more often, especially on textured fabrics that trap particles. Summer humidity demands minimal moisture and faster drying. Autumn adds leaf debris; brush off jackets at the door and use side tables to keep snacks off cushions. Winter introduces salt and slush; avoid sitting in wet outerwear and wipe down armrests more often. Window management matters year-round: use blinds during peak sun to limit fading and rotate furniture to distribute exposure.
Beginner Mistakes to Avoid
- Rubbing stains: This spreads soil and damages fibers.
- Skipping the vacuum: Wetting soil creates muddy residue and rings.
- Using colored towels: Dyes can transfer to damp fabric.
- Overwetting: Excess moisture causes slow drying and odors.
- Ignoring test spots: Some changes only appear after drying.
When to Ask for Help
It is okay to call in reinforcements. Seek assistance if you face a solvent-only fabric, an older set-in stain, visible dye transfer during testing, or persistent pet odors that return after your best effort. A professional reset makes beginner maintenance much easier by removing deep soil and balancing moisture properly.
Middle-of-the-Year Confidence Check
Halfway through the year, take stock. Are spots reappearing, or does the sofa smell a little stale after rain? Use this checkpoint to revise your routine and consider a professional upholstery cleaning to bring everything back to neutral. After a deep refresh, your weekly tasks will feel lighter and your results more predictable.
Frequently Asked Questions
Q: How much cleaner should I use? A: Less than you think. Apply small amounts to a cloth, not directly to the fabric, and increase only if needed. Residue attracts dirt.
Q: Can I steam my couch? A: Steam is not universally safe. Some fabrics will watermark or change texture. Start with minimal-moisture methods and test carefully.
Q: Why do my spots come back after drying? A: That is wicking—soil rises from deeper layers. Improve pre-vacuuming, extend your cleaning zone, and dry faster with fans.
Q: What if I do not know my fabric? A: Test very conservatively in a hidden area and consider professional guidance for the first deep clean.
Q: How do I keep pet hair under control? A: Use a slightly damp cloth or rubber glove to gather hair before vacuuming, and place washable throws on favorite pet spots.
Q: Are enzyme cleaners safe indoors? A: Yes, on compatible fabrics, when used as directed. Ventilate lightly, allow dwell time, and remove residue with a damp cloth if your code allows.
Your Fresh-Start Finish
Small steps lead to beautiful results. With a simple kit, a steady routine, and smart drying, you will keep your furniture inviting for family time and guests alike. When you want an effortless reset and a confidence boost, book a seasonal upholstery cleaning and enjoy brighter colors, softer textures, and a fresher Tampa home.